This section is intended to be a general overview and not an in-depth how-to. Feel free to review the WordPress Codex how-to on creating and using pages for more information.
Creating & Updating Pages
New Pages & Page Details
Creating a New Page
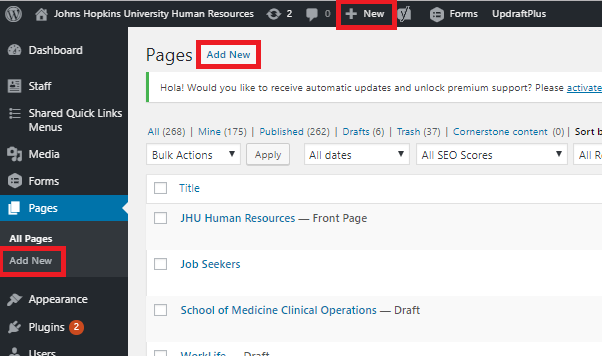
WordPress allows you to create pages from various views within their dashboard. Feel free to create a new page using one of the options described below (image for reference).
 Option 1
Select “+ New” from the top black menu bar in WordPress and then select “Page”; or
Option 2
Select “Pages” from the left sidebar in WordPress and then select “Add New”; or
Option 3
From the “Pages” section in WordPress, select the “Add New” button at the top next to the page title.
Required Page Details
Page Title
The page title is required for all pages and can be found at the top of the page editor window. The text you enter here will become your title and Heading 1 (H1) level heading used for screen readers/accessibility. This title will also become part of the URL. See below for reference:

Page Content
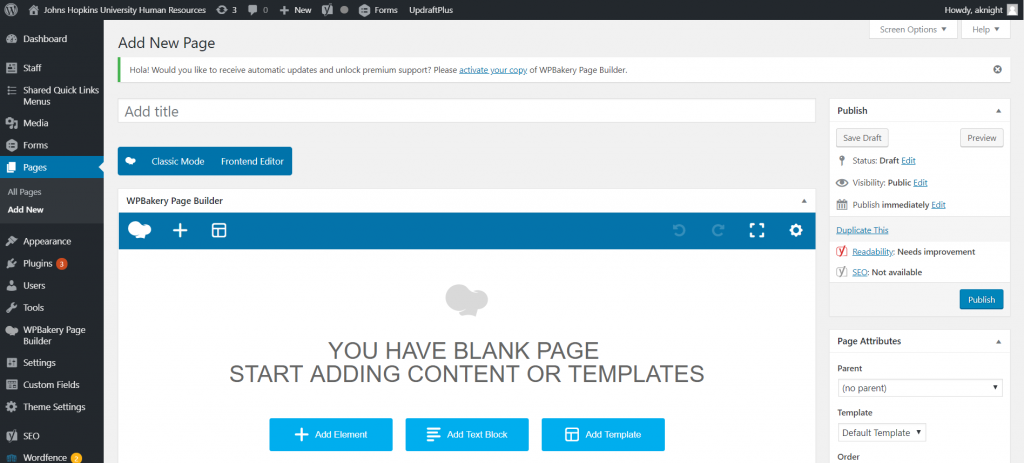
To start entering content on your new page, select the WPBakery “Backend Editor” button from the blue bar located under the title field. See image below for reference:

This will enable the WPBakery Page Builder. To start entering plain text content, select the “Add New Text Box” option that appears. Image below shows what the editor will look like after selecting the “Backend Editor” button:
Need more information on WPBakery Page Builder?
Find more WPBakery Information Here
Page Attributes
Follow the in-depth Page Settings section of the manual for page attribute options.
Basic Page Options
Previewing a Page
PREVIEW PAGE
Once content is entered, select the top “Preview” button to view your page with (updated) content. This will not publish your page but instead open a new tab/window for you to view your content updates. Feel free to select this button as often as you’d like to review changes you’ve made on the back-end of the site before publishing a page.

Creating a Draft

SAVING A PAGE DRAFT
If you have a new page that has yet to be published, you can save a draft of your page. This will allow your content to be saved on the back-end of the website without releasing it to the front-end of the website for users to see. Once content is entered, select the “Save Draft” button (as pictured above). This will not publish your page.
Publishing a Page
Publishing a Page
Published pages are live on the website and will be available for external users of the website. Once this process is complete, you cannot modify pages in draft mode.
- On the page editor, edit content as desired
- Once you’re ready, select the “Publish” button found on the right menu titled “Publish”
- You’re ready to view the page on the front-end of the site

Advanced Page Options
Reverting a Page to a Previous Version
Before starting this process, access the back-end of the page by following the Editing a Published Page how-to.
- On the right menu titled “Publish”, select “Browse” next to the revision clock icon titled “Revisions:” – see image for reference:

- On the new revision review page, use the left and right “Previous” and “Next” buttons to review changes
- To revert to a previous version – go to the proper revision in this section then select “Restore This Revision”
Important: Reverting to a previous version of the site will remove all content entered after that moment and you will be unable to access this information in the future.